If you are working a lot with unit tests and somehow are allergic to command line testing (I, for one, am) there is an easy way to configure your test project’s build to start your favorite’s library GUI automatically and load the test assembly into it.
This is very convenient and, as a bonus, allows you to set breakpoints in the test code, without having to attach to any processes.
Let’s have a quick look at how you can do that for xUnit and nUnit.
Startup project 🔗
Let’s assume you have your solution in place, and a unit test project in there already available (could be xUnit or nUnit).
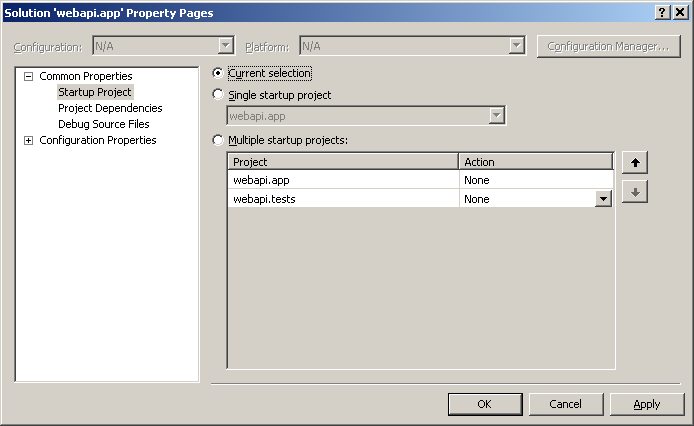
Now, you need to change your solution so that it doesn’t launch the default startup project automatically (normally that would be the web app/MVC project), but rather each project can run separately. That is done by going to solution properties and modifying “Startup project” to “current”.
See screenshot below.
This allows us to explicitly run the tests project.
xUnit 🔗
xUnit is my personal favorite, but it’s totally up to you which one to use (we’ll do the same for nUnit next).
Now you need to define the external project that should be run upon the build-and-start action. You can do it in two ways: either by editing the project file manually or through Visual Studio.
If you do this manually, you need to go to [your_test_project].csproj.user file and add the follwing in there:
<PropertyGroup Condition="'$(Configuration)|$(Platform)' == 'Release|AnyCPU'">
<StartAction>Program</StartAction>
<StartProgram>C:xunitxunit.gui.clr4.exe</StartProgram>
<StartArguments>webapi.tests.dll</StartArguments>
<StartWorkingDirectory>$(MSBuildProjectDirectory)binRelease</StartWorkingDirectory>
</PropertyGroup>
<PropertyGroup Condition="'$(Configuration)|$(Platform)' == 'Debug|AnyCPU'">
<StartAction>Program</StartAction>
<StartProgram>C:xunitxunit.gui.clr4.exe</StartProgram>
<StartArguments>webapi.tests.dll</StartArguments>
<StartWorkingDirectory>$(MSBuildProjectDirectory)binDebug</StartWorkingDirectory>
</PropertyGroup>
We have two entries - for both Release and Debug configurations. Also, you need to provide correct path to the xUnit GUI and a name of your test assembly. Theoretically it should work with $(AssemblyName).dll placeholder, but in practice that is not always the case.
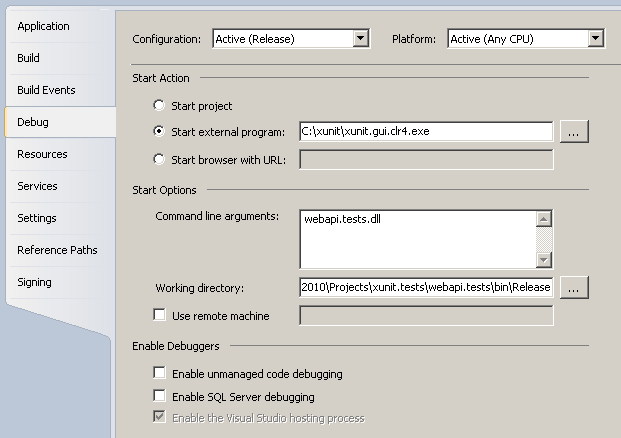
Alternatively, if you do not want to meddle with XML files, you can set the same via Visual Studio. Just go to project properties > Debug tab and set the same properties there:
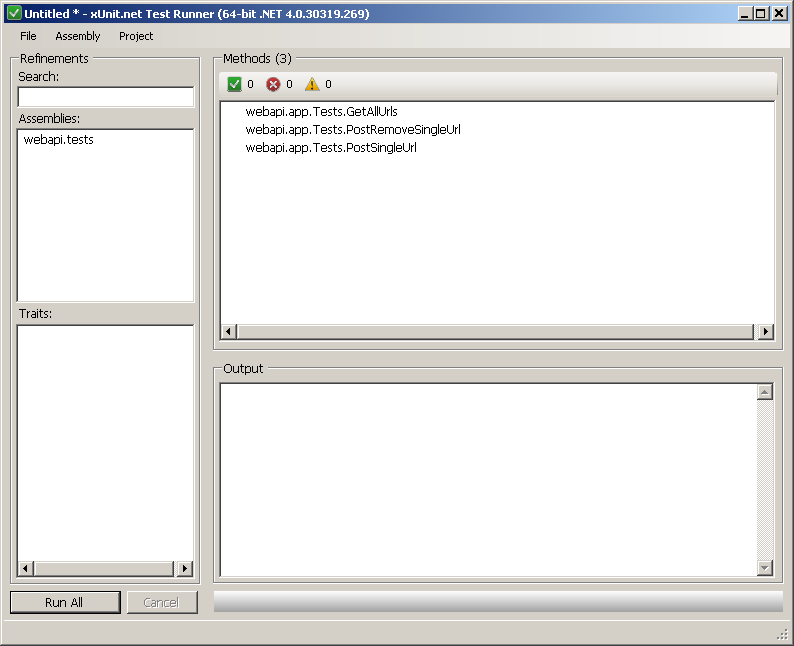
If you now run the tests project (F5), the GUI starts automatically and the test DLL is loaded. xUnit (as opposed to nUnit) does not currently provide and option to externally trigger the test run, so you have to click “Run” manually. there is a work item for that, so you can go ahead and vote on this feature. Or just harass Brad on Twitter.
nUnit 🔗
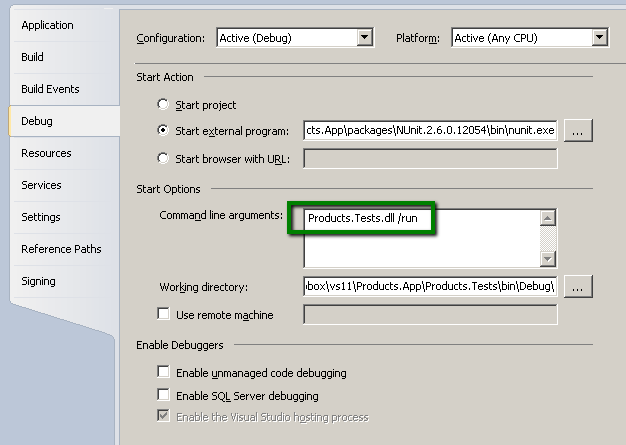
With nUnit, the setup is nearly identical, you also specify the path to the GUI and the name and location of your assembly. Similarily, you can do that via the csproj.user file or directly from Visual Studio. The only difference is that yo ucan also specify a /run startup attribute, which will force the tests to automatically execute (no need to click anything).
See screenshot:
Now when you run your test project, nUnit starts and executes tests automatically.
Summary 🔗
It is really easy to setup your environment to leverage on the test libraries GUI. You can run them with a click of a button directly from Visual Studio and that is both convenient and time saving. As mentioned, now you can also set breakpoints in your test code and see what’s happening.
Hopefully someone finds this useful. Till next time!


