For a few years in a row now, around this time of the year, I have been writing a festive Q# quantum computing post. This year I would like to keep the tradition going and explore another fun topic .
Ever wondered what would happen if we let quantum mechanics decorate a 🎄 Christmas tree ? Let’s explore a quantum program - in both my favorite quantum programming language, Q#, as well as in Qiskit - that makes quantum effects visible through festive decorations.
Core Idea 🔗
We are going to write Q# and Qiskit programs that will generate decoration patterns for a Christmas tree, emerging from fundamental quantum phenomena. We will then wrap this in a Python orchestrator, which will be responsible for running the quantum simulations, post-process the results and visualizing them as a decorated tree, printed to the ANSI terminal.
In order to make the application portable between Q# and Qiskit, we are going to start by introducing a simple abstraction layer that will allow us to run the same code on both platforms, without having to change the core logic. The abstraction supports running the quantum circuit for a given number of positions on the tree and returning the binary result string, corresponding to the decorations.
class QuantumSimulator(ABC):
    @abstractmethod
    def run_simulation(self, num_positions: int) -> str:
        """Run quantum simulation and return binary result string"""
        pass
Qiskit variant of the simulator will use the Aer simulator to run the quantum circuit.
class QiskitSimulator(QuantumSimulator):
    def run_simulation(self, num_positions: int) -> str:
        # build up our circuit, omitted for brevity

        simulator = AerSimulator()
        result = simulator.run(circuit).result()
        counts = result.get_counts(circuit)
        return list(counts.keys())[0]
For Q#, where the program is typically written in a dedicated .qs, the simulator implementation will load that file and then invoke a predefined Q# operation:
class QSharpSimulator(QuantumSimulator):
    def __init__(self, source_code: str):
        self.source_code = source_code
        qsharp.eval(self.source_code)

    def run_simulation(self, num_positions: int) -> str:
        result = qsharp.run(f"QuantumDecoration.CreateQuantumDecoration({num_positions})", shots=1)
        return ''.join(['1' if x == qsharp.Result.One else '0' for x in result[0]])
This implies that our Q# code has to be wrapped in a CreateQuantumDecoration operation, that takes a number of positions on the tree as an input and returns a list of results.
namespace QuantumDecoration {
    operation CreateQuantumDecoration(numPositions : Int) : Result[] {
        // omitted for brevity
    }
}
Building the Quantum Circuit 🔗
For each position on our tree, we will use a three-qubit quantum system to determine the decorations. Our possible decorations are:
- Red ● (classical ornament)
- Yellow ★ (star)
- Blue ♦ (diamond)
- Magenta ✶ (sparkle)
Below is the necessary initialization code, first in Q# and then in Qiskit (this is pattern that we will follow throughout the post).
let qubitsNeeded = numPositions * 3;
use qubits = Qubit[qubitsNeeded];
qubits_needed = num_positions * 3
qr = QuantumRegister(qubits_needed, 'q')
cr = ClassicalRegister(qubits_needed, 'c')
circuit = QuantumCircuit(qr, cr)
Why three qubits? The first qubit determines presence ($\ket{0}$ = no decoration, $\ket{1}$ = decoration), while the next two qubits encode the decoration type in binary:
- $\ket{00}$ → ● (circle)
- $\ket{01}$ → ★ (star)
- $\ket{10}$ → ♦ (diamond)
- $\ket{11}$ → ✶ (sparkly star)
With that in place, we are ready to build the quantum circuit. First, we will place all qubits in the superposition using the H gate.
for i in 0..qubitsNeeded-1 {
    H(qubits[i]);
}
for i in range(qubits_needed):
    circuit.h(qr[i])
By applying the initial Hadamard gates, we place each qubit into a quantum superposition, allowing each position to exist as both decorated and undecorated—encompassing every possible decoration type. Although this technique draws inspiration from quantum random walks, it doesn’t strictly follow a canonical quantum walk protocol. Instead, we introduce quantum interference effects using phase gates, leveraging similar principles to shape complex, non-classical decoration patterns.
for i in 0..3..qubitsNeeded-1 {
    S(qubits[i]);
    T(qubits[i+1]);
    T(qubits[i+2]);
}
for i in range(0, qubits_needed, 3):
    circuit.s(qr[i])
    circuit.t(qr[i+1])
    circuit.t(qr[i+2])
These phase rotations are crucial. The S gate ($\frac{\pi}{2}$ rotation) on the presence qubit and T gates ($\frac{\pi}{4}$ rotation) on the type qubits create different phase relationships. When we then apply another set of Hadamard gates, these phases interfere, making some decoration patterns more likely than others - some patterns become more likely through constructive interference, while others are suppressed through destructive interference.
for i in 0..qubitsNeeded-1 {
    H(qubits[i]);
}
for i in range(qubits_needed):
    circuit.h(qr[i])
It’s like creating “quantum rules” for how decorations prefer to appear.
Next, we are going to add some entanglement to the qubits - for our decorations it will mean both spatial and type-presence entanglement.
// entanglement - connecting presence qubits
for i in 0..3..qubitsNeeded-4 {
    CNOT(qubits[i], qubits[i+3]);
}

// connect presence to type within each position
for i in 0..3..qubitsNeeded-1 {
    CNOT(qubits[i], qubits[i+1]);
    CNOT(qubits[i], qubits[i+2]);
}
# Spatial entanglement
for i in range(0, qubits_needed-3, 3):
    circuit.cx(qr[i], qr[i+3])

# Type-presence entanglement
for i in range(0, qubits_needed, 3):
    circuit.cx(qr[i], qr[i+1])
    circuit.cx(qr[i], qr[i+2])
Here’s where quantum magic really happens:
- First set of CNOTs: Links adjacent positions together (the presence qubit is every third qubit, hence the step of 3)
- Second set: Connects the presence of a decoration with its type
When we measure later, these CNOT connections ensure that nearby decorations influence each other and that the type of decoration is quantum-correlated with its presence. These quantum correlations produce patterns that would be impossible with classical random number generators.
The final step is to apply the Hadamard gates again and perform the measurements.
for i in 0..qubitsNeeded-1 {
    H(qubits[i]);
}

let results = MeasureEachZ(qubits);
ResetAll(qubits);
for i in range(qubits_needed):
    circuit.h(qr[i])

circuit.measure(qr, cr)
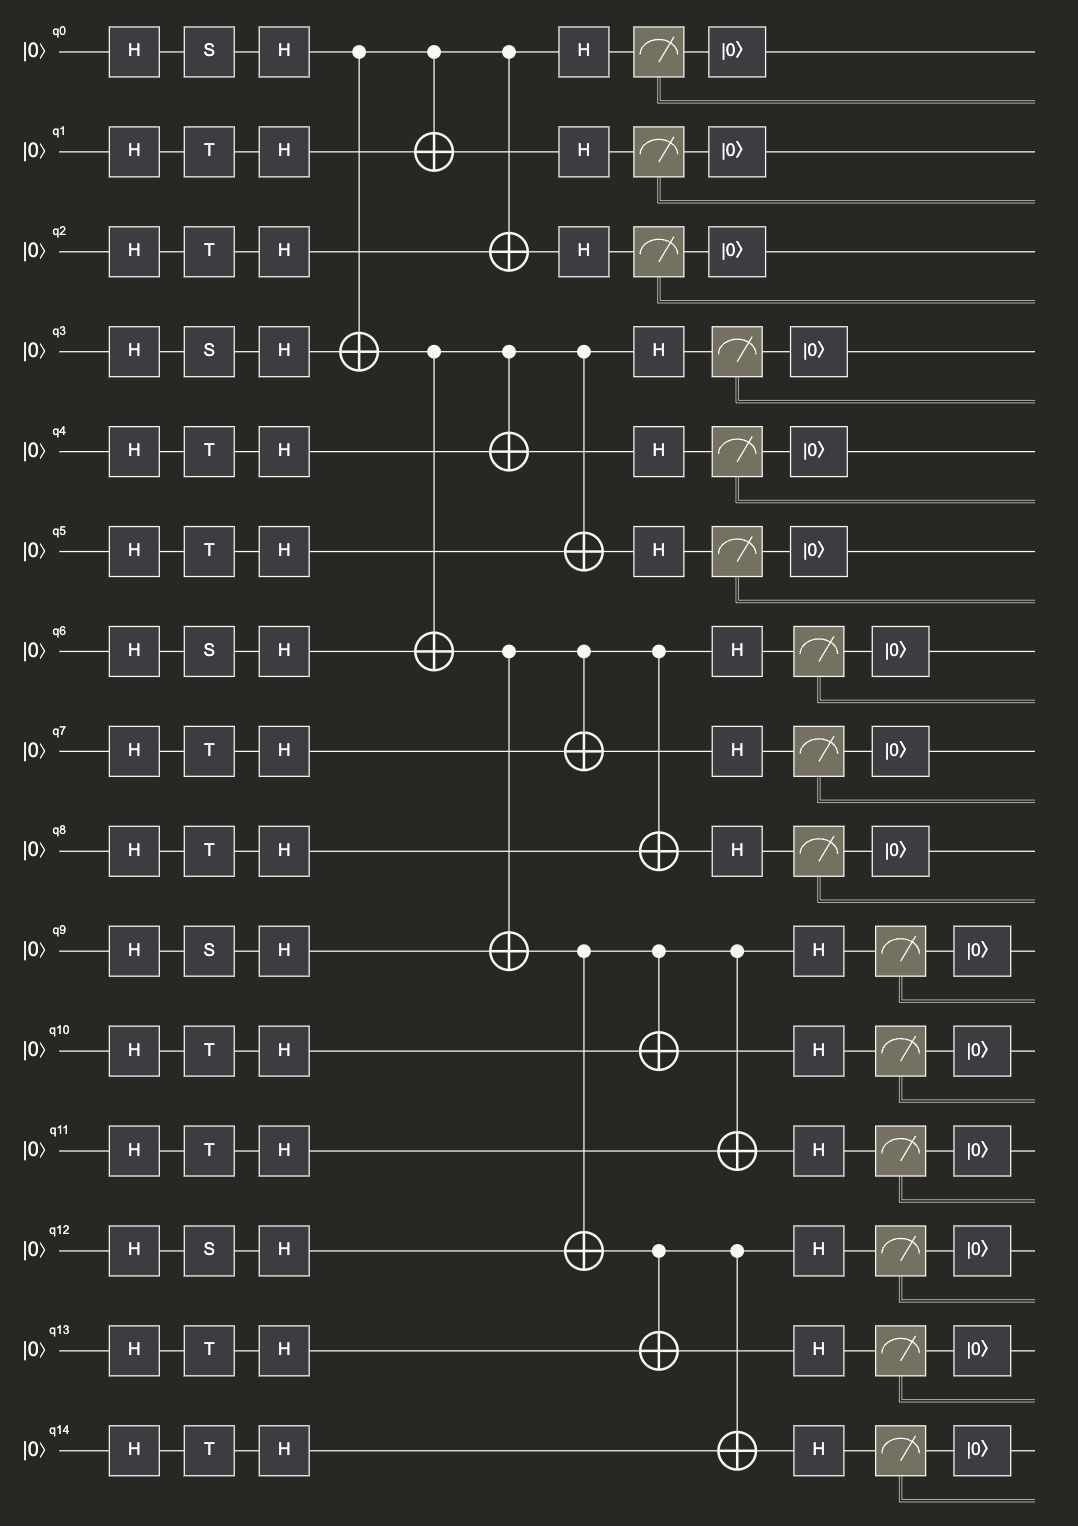
The final circuit (for 15 qubits) looks like this:
Managing Resources in a Simulator 🔗
For simplicity we are going to run these quantum circuits on a simulator, however, there is nothing stopping you from running them on a real quantum computer.
One fascinating aspect of a quantum simulation is the exponential growth in computational resources needed as the number of qubits increases. The quantum simulator needs to track $2^n$ complex numbers for $n$ qubits. Imagine a row with 24 positions - that’s 72 qubits (3 per position), and the simulator needs to track $2^{72} \approx 4.7 \times 10^{21}$ complex numbers!
This isn’t just a practical limitation - it’s a profound reminder of the vast quantum state space we’re working with. The workaround is to process the tree in small chunks of 5 positions (15 qubits) at a time, keeping the quantum effects local but manageable.
def create_quantum_decorations(width: int, simulator: QuantumSimulator) -> Tuple[List[int], List[int]]:
    """Create quantum decorations using the provided simulator."""
    max_positions = 5
    results_decorations = []
    results_types = []

    for start_pos in range(0, width, max_positions):
        positions = min(max_positions, width - start_pos)
        binary = simulator.run_simulation(positions)
        decorations, types = parse_quantum_results(binary, positions)
        results_decorations.extend(decorations)
        results_types.extend(types)

    return results_decorations[:width], results_types[:width]
When we measure, the quantum state collapses into classical bits, forming binary strings that encode the decorations. We can then post-process that into data relevant for our tree.
def parse_quantum_results(binary_result: str, num_positions: int) -> Tuple[List[int], List[int]]:
    """Parse binary quantum results into decorations and types."""
    decorations = []
    types = []

    for i in range(0, num_positions * 3, 3):
        presence = int(binary_result[i])
        if presence:
            type_bits = binary_result[i+1:i+3]
            decoration_type = int(type_bits, 2)
        else:
            decoration_type = 0
        decorations.append(presence)
        types.append(decoration_type)

    return decorations, types
Each group of three bits tells us two things. The first bit tells us if there is a decoration at this position, while the next two bits encode the type of decoration.
- 100 = Red ornament (presence=1, type=00)
- 101 = Yellow star (presence=1, type=01)
- 110 = Blue diamond (presence=1, type=10)
- 111 = Magenta sparkle (presence=1, type=11)
- 000 = No decoration (presence=0, type bits ignored)
Visualizing the Decorations 🔗
Finally, we can visualize the decorations on the tree - we will use ANSI terminal codes to print the tree with decorations. The rest of the orchestrator is shown below. The comments should be self-explanatory, and it is not the core focus of this post.
class Colors:
    RED = '\033[31m'
    GREEN = '\033[32m'
    YELLOW = '\033[33m'
    BLUE = '\033[34m'
    MAGENTA = '\033[35m'
    RESET = '\033[0m'
    BOLD = '\033[1m'

def create_quantum_decorations(width: int, simulator: QuantumSimulator) -> Tuple[List[int], List[int]]:
    """Create quantum decorations using the provided simulator."""
    max_positions = 5
    results_decorations = []
    results_types = []

    for start_pos in range(0, width, max_positions):
        positions = min(max_positions, width - start_pos)
        binary = simulator.run_simulation(positions)
        decorations, types = parse_quantum_results(binary, positions)
        results_decorations.extend(decorations)
        results_types.extend(types)

    return results_decorations[:width], results_types[:width]

def get_decoration_char(type_num: int) -> str:
    """Return a festive decoration character based on the type"""
    chars = ['●', '★', '♦', '✶']
    return chars[type_num]

def get_color_code(type_num: int) -> str:
    """Return a color code based on the type"""
    colors = [Colors.RED, Colors.YELLOW, Colors.BLUE, Colors.MAGENTA]
    return colors[type_num]

def draw_christmas_tree(height: int, simulator: QuantumSimulator) -> None:
    """Draw a colorful tree with quantum decorations"""
    print(f"\n{Colors.BOLD}🎄 Quantum Christmas Tree! 🎄\n{Colors.RESET}")

    # draw star on top
    padding = height - 1
    print(" " * padding + f"{Colors.YELLOW}★{Colors.RESET}")

    # draw the tree from top to bottom
    for i in range(height):
        width = 2 * i + 1
        padding = height - i - 1

        # get quantum decorations and their types
        decorations, types = create_quantum_decorations(width, simulator)

        # create the row string
        row = " " * padding
        for j in range(width):
            if decorations[j]:
                color = get_color_code(types[j])
                decoration = get_decoration_char(types[j])
                row += f"{color}{decoration}{Colors.RESET}"
            else:
                row += f"{Colors.GREEN}*{Colors.RESET}"

        print(row)

    # Draw the trunk
    trunk_height = height // 3
    trunk_width = height // 2
    for i in range(trunk_height):
        trunk_padding = height - trunk_width//2 - 1
        print(" " * trunk_padding + f"{Colors.MAGENTA}#{Colors.RESET}" * trunk_width)

    # draw base decorations
    base_width = height * 2 - 1
    print(" " * 0 + f"{Colors.GREEN}~{Colors.RESET}" * base_width)
    print(f"\n{Colors.BOLD}🎁 Happy Quantum Holidays! 🎁{Colors.RESET}\n")

if __name__ == "__main__":
    tree_height = 12

    # try Q# first, fall back to Qiskit if the file is not there
    try:
        with open('tree.qs', 'r') as file:
            qs_content = file.read()
        simulator = QSharpSimulator(qs_content)
    except FileNotFoundError:
        print("Q# source not found, using Qiskit simulator")
        simulator = QiskitSimulator()

    draw_christmas_tree(tree_height, simulator)
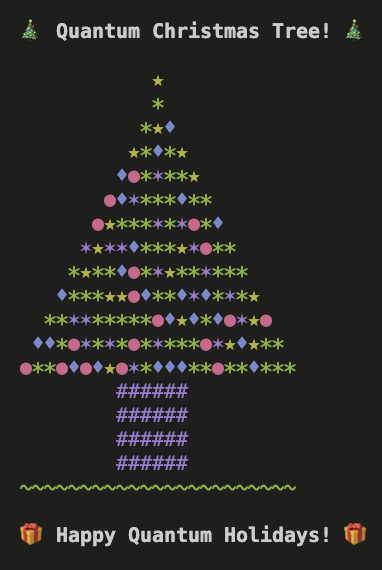
If we now run this code with the tree.qs present, the Q# simulator will be used, otherwise, the Qiskit simulator will be used. The result will be a beautifully (OK, maybe that is a matter of taste!) decorated Christmas tree, with ornaments generated by quantum effects. A sample output is shown below.
Summary 🔗
The patterns we see in these measurements reflect genuine quantum phenomena. Instead of relying on classical random number sampling, true quantum randomness arises from measuring qubits in superposition. Some decoration arrangements appear more frequently thanks to quantum interference, while entanglement weaves correlations between adjacent decorations and between their presence and types. Although these patterns may be subtle and might require careful statistical analysis to fully appreciate, the underlying principle—that phase shifts and entangling operations influence the outcome distribution - is a core concept in quantum computing.
While our quantum Christmas tree is playful, it still illustrates profound ideas in quantum computing. The interplay of superposition, interference, and entanglement gives rise to patterns that emerge from the strange rules of quantum mechanics. Every time you run this code, you’re not just generating random decorations - you’re observing the collapse of a complex quantum state into a festive pattern. The decorations you see are manifestations of genuine quantum mechanical processes, making each tree uniquely quantum!
The source code for this post is available on GitHub.
As the holiday season is coming up, I want to wish everyone happy holidays. I hope you get to spend some great time with your family and friends! 🎅🏻


